This section details how to manage your process definitions in OpsRamp.
Accessing Process Definitions:
To aceess Process Definitions,
- Navigate to Automation > Process Automation 2.0 > Process Definitions to view the list of saved process definitions.
- Hover over the process definition you want to manage and click the actions menu (…) on the right.

The following section describes each option in detail.
Copy: Duplicate the selected process definition.
Remove: Delete one or multiple selected process definitions.
- Single: Click Remove from the action menu, then confirm.
- Multiple: Select definitions, click the top-right Remove button, then confirm.
Audit Logs: View the change history. The following table explains each field in detail:
Field Description Date & Time The date and time when the selected process definition was last updated. Properties The process definition property that was updated. Sub-properties The field that was last updated. Operations The type of operation last executed on the process definition, such as - updated, triggered. Previous Value The field value before updating. Export/Import:
- Export: Select a definition from the list, click its action menu, then Export to download a JSON file.
- Import: Click the Import icon, select a JSON file, and click Import to create a new definition.
Note
Imported definitions do not support export until activated. Activate imported definitions by clicking the actions menu (…) and selecting Activate. Make necessary changes, then Save and Deploy.Filter Process Definitions You can filter process definitions by Created Date, Updated Date, and other criteria. The displayed list of process definitions will dynamically update based on your selected filter criteria.
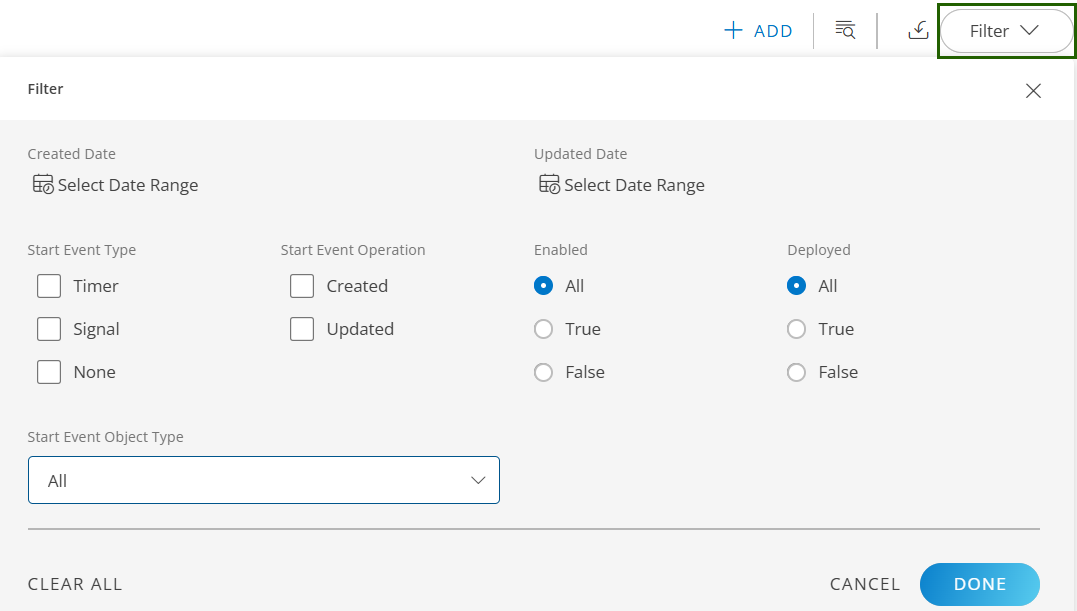
The following table describes each filter criteria in detail:
Field Description Created Date The date on which the process definition was created. Use the calendar to select the date. Updated Date The date on which the process definition was updated. Use the calendar to select the date. Start Event Type Select process definitions whose start event type matches Timer, Signal, or None. Start Event Operation Select the process definition whose start operation matches Created and/or Updated. Enabled Select the process definition that are enabled, disabled, or either. Deployed Select the process definition that are deployed, not deployed, or either. Start Event Object Type Select the process definition whose start event object type matches the options from the drop-down list. Enable and Disable the Notify Toggle: Use the Notify toggle to receive notifications for workflow failures or stuck states. Recipients can be OpsRamp users or external email addresses (CC field).
The notification configuration options are:
- When Stuck: Triggers if the process is stuck at a task for a specified duration.
- When Failed: Triggers if the process fails at a task a specified number of times.

When you select the above options When Stuck and When Failed, the following fields are available:
Name Value Description Action Notify
Notify and CancelConfigured users will receive email notifications accordingly with the configured time and error count frequency.
The configured users will receive email notifications accordingly with the configured time and error count frequency, and the stuck running instance will be moved to the Completed section with the state shown as "Externally Terminated".Duration Time When Stuck has the following options:
15, 20, 25, 30, 45, and 60.
When failed has the following options:
2 to 10If any process instance is stuck or has failed, users will be notified for the selected duration. Notify Frequency Only Once
Every TimeIf Only Once is selected,the process workflow will send only one email notification to the user when a task is stuck or failed for the specified duration. When the Every Time option is selected, the process workflow will keep on sending the notification whenever the workflow is failing or stuck for the specified duration. Notify Users Select from the list You can select the list of available users from the drop-down list to send email notifications. CC Users Any external email address If you want to notify any external email address, mention it in the cc field. 
As part of enabling the Failure/Stuck notifications for process workflows, a new column Notify is added under the Workflows listing page. If the user enables or disables the notify option in this listing page, it will get enabled or disabled in the workflow page accordingly.